Phone Controlled Robot Arm
This project is a robot arm that is controlled via your smartphone. It can complete simple tasks such as moving objects around and picking up items. You can control the robot using your phone and create custom movements for the robot to automatically follow.
| Sundeep Kalidindi | Dublin High School | Computer Science | Incoming Senior |
( )
)
```#include
void setup() { myservo1.attach(3); // set the control pin of servo 1 to 3 digital I/0 myservo2.attach(5); // set the control pin of servo 1 to 3 digital I/0 myservo3.attach(6); // set the control pin of servo 1 to 3 digital I/0 myservo4.attach(9); // set the control pin of servo 1 to 3 digital I/0
myservo1.write(pos1); myservo2.write(pos2); myservo3.write(pos3); myservo4.write(pos4); delay(1500); Serial.begin(9600); // set the baud rate to 9600 }
void loop()
{
while (Serial.available())
{
incomingByte = Serial.read(); //One byte by byte, the next sentence is read into a string array to form a completed packet
if (incomingByte == ‘%’)
{
num_reveice = 0;
startBit = true;
}
if (startBit == true)
{
num_reveice++;
inputString += (char) incomingByte;
}
if (startBit == true && incomingByte == ‘#’)
{
newLineReceived = true;
startBit = false;
}
if(num_reveice >= 20)
{
  num_reveice = 0;
  startBit = false;
  newLineReceived = false;
  inputString = "";
}     }
if(newLineReceived) { Serial.println(inputString); if(inputString.substring(0,3)==”%4#”){ Serial.println(“Up”);
     // raise the arm
    for(pos3;pos3<100;pos3++)
    {
      myservo3.write(pos3);
      delay(5);
    }
    delay(1500);

  }else if(inputString.substring(0,3)=="%5#"){
     Serial.println("Close");
    // close the claw
    for(pos4;pos4>45;pos4--)
    {
      myservo4.write(pos4);
    }
    delay(1000);


  }else if(inputString.substring(0,3)=="%7#"){


     Serial.println("Down");
     // Lower the arm
     for(pos3;pos3>40;pos3--)
     {
        myservo3.write(pos3);
        delay(5);
     }
     delay(1000);


  }else if(inputString.substring(0,3)=="%A#"){
     Serial.println("Forward");
      //  stretch out the arm
      for(pos2;pos2<130;pos2++)
      {
        myservo2.write(pos2);
        delay(5);
      }
      delay(1000);

  }else if(inputString.substring(0,3)=="%B#"){

     Serial.println("Left");
     for(pos1;pos1<150;pos1++)
      {
        myservo1.write(pos1);
        delay(5);
      }
      delay(1000);

  }else if(inputString.substring(0,3)=="%C#"){
     Serial.println("Right");
     for(pos1;pos1>30;pos1--)
     {
        myservo1.write(pos1);
        delay(5);      // delay 5ms(used to adjust the servo speed)
     }
     delay(1000);
  }else if(inputString.substring(0,3)=="%D#"){
     Serial.println("Backward");
      // retracte the arm
      for(pos2;pos2>80;pos2--)
      {
        myservo2.write(pos2);
        delay(5);
      }
      delay(1000);

  }else{
    Serial.println("Default");
     // open the claw
   for(pos4;pos4<120;pos4++)
   {
     myservo4.write(pos4);
   }
    delay(1000);
  }
  inputString = "";   // clear the string
  newLineReceived = false; }
}
```#include <Servo.h> // add the servo libraries
Servo myservo1; // create servo object to control a servo
Servo myservo2;
Servo myservo3;
Servo myservo4;
int pos1=90, pos2=90, pos3=90, pos4=90; // define the variable of 4 servo angle,and assign the initial value (that is the boot posture
//angle value)
const int right_X = A2; // define the right X pin to A2
const int right_Y = A5; // define the right Y pin to A5
const int right_key = 7; // define the right key pin to 7(that is the value of Z)
const int left_X = A3; // define the left X pin to A3
const int left_Y = A4; // define the left X pin to A4
const int left_key = 8; //define the left key pin to 8(that is the value of Z)
int x1,y1,z1; // define the variable, used to save the joystick value it read.
int x2,y2,z2;

void setup()
{
// boot posture
myservo1.write(pos1);
delay(1000);
myservo2.write(pos2);
myservo3.write(pos3);
myservo4.write(pos4);
delay(1500);
pinMode(right_key, INPUT); // set the right/left key to INPUT
pinMode(left_key, INPUT);
Serial.begin(9600); // set the baud rate to 9600
}
void loop()
{
myservo1.attach(3); // set the control pin of servo 1 to D3  dizuo-servo1-3
myservo2.attach(5); // set the control pin of servo 2 to D5  arm-servo2-5
myservo3.attach(6); //set the control pin of servo 3 to D6   lower arm-servo-6
myservo4.attach(9); // set the control pin of servo 4 to D9  claw-servo-9
x2 = analogRead(right_X); //read the right X value
y2 = analogRead(right_Y); // read the right Y value
z2 = digitalRead(right_key); //// read the right Z value
x1 = analogRead(left_X); //read the left X value
y1 = analogRead(left_Y); //read the left Y value
z1 = digitalRead(left_key); // read the left Z value
//delay(5); // lower the speed overall

// claw
claw();

// rotate
turn();

// upper arm
upper_arm();

//lower arm
lower_arm();
}

//***************************************************
//claw
void claw()
{
//claw
if(x1<50) // if push the left joystick to the right
{
pos4=pos4+3;
myservo4.write(pos4); //servo 4 operates the motion, the claw gradually opens.
delay(5);

if(pos4>120) //limit the largest angle when open the claw
{
pos4=120;
}
}

if(x1>1000) ////if push the right joystick to the left
{
pos4=pos4-3;
myservo4.write(pos4); // servo 4 operates the action, claw is gradually closed.
delay(5);
if(pos4<45) //
{
pos4=45; //limit the largest angle when close the claw
}

}
}

//******************************************************/
// turn
void turn()
{
if(x2<50) //if push the right joystick to the let
{
pos1=pos1+3;
myservo1.write(pos1); // arm turns left
delay(5);
if(pos1>180) //limit the angle when turn right
{
pos1=180;
}

}

if(x2>1000) // if push the right joystick to the right
{
pos1=pos1-3;
myservo1.write(pos1); //servo 1 operates the motion, the arm turns right.
delay(5);
if(pos1<1) // limit the angle when turn left
{
pos1=1;
}
}
}

//**********************************************************/
// lower arm
void lower_arm()
{
if(y2>1000) // if push the right joystick downward
{
pos2=pos2-2;
myservo2.write(pos2); // lower arm will draw back
delay(5);
if(pos2<25) // limit the retracted angle
{
pos2=25;
}
}

if(y2<50) // if push the right joystick upward
{
pos2=pos2+2;
myservo2.write(pos2); // lower arm will stretch out
delay(5);
if(pos2>180) // limit the stretched angle
{
pos2=180;
}
}
}

//*************************************************************/

//upper arm
void upper_arm()
{
if(y1<50) // if push the left joystick downward
{
pos3=pos3-2;
myservo3.write(pos3); // upper arm will go down
delay(5);
if(pos3<1) //  limit the angle when go down
{
pos3=1;
}
}
if(y1>1000) // if push the left joystick upward
{
pos3=pos3+2;
myservo3.write(pos3); // the upper arm will lift
delay(5);

if(pos3>135) //limit the lifting angle
{
pos3=135;
}
}
}
Final Milestone
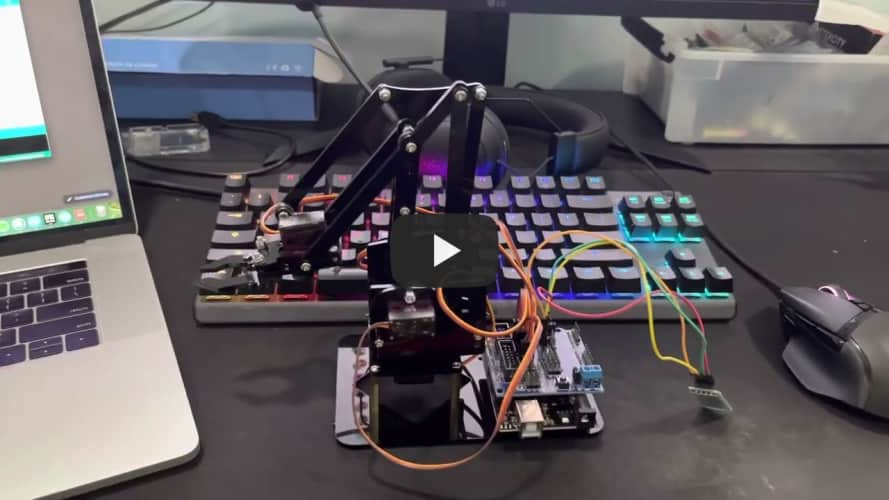
My final milestone for this project was to connect the mobile device and the robot. I managed to finish all the programming and paired it to my Android device through the HC05 bluetooth module. I ran into one major problems which was that an IOS device was unable to support the code so I had to use an Android in order for it to work properly. Once the code was connected properly, all the controls were working and the robot could move however I want it to. Additionally, I wanted to further add modifications to the project. I ended up connecting a PS2 controller with joystick sensors to the robotic arm. The controller used joysticks to move the robot and it did the same thing as the mobile app. I had to program a different file of code for the controller because it was different from the mobile app. An obstacle that appeared during milestone three was that one of my servos was screwed on too tight. This prevented the robot arm from going up and down. To fix this I had to dismantle some of the robot so I can loosen the servo. By the end of the milestone I had successfully completed the project and even added an extra modification.

Second Milestone
My second milestone for this project was being able to fully complete building the physical portion of the robot. Additionally I also started the code to connect the bluetooth module to the robot. I first went through the tutorial of the instructions and managed to complete the robot with minimal difficulties. One major challenge that I ran into was that some pieces were breaking when I was installing them. Fortunately it wasn’t a huge issue because the parts were easily replaceable. But if an important piece were to break it would cause probelms so in the future I used less pressure when using different parts. After the robot was successfully built, I started to work on the code. At first the code was really complicated so it took time to get started on it. I ended up hooking up the bluetooth module to my computer and for my next steps I want to fully complete the code and pair it with the robot.
My first milestone for this project was being able to understand the parts needed for my phone controlled robot arm and get a servo up and running. First I learned about the different parts that are essential for this robotic arm project. The main component being the Arduino Board, I learned its various functions and how to connect it to my laptop to be able to program on it. I then learned how to make an LED light up using the Arduino and a breadboard. Then I moved onto something more complicated and connected a servo to the Arduino board. This let me change the movement of the servo with any input that I desired. Some issues that I ran into were that my servo at first didn’t rotate and I fixed this by modifying the code and placing the jumper wires in the proper pin holes. In this first modification I also started to get my bluetooth connection working. My next steps are to be able to get a fully functional bluetooth connection and assemble the robot arm itself.
